White Baldy Summit Loop
- CJ Wolf
- Aug 1, 2025
- 4 min read
Fast Facts:
Base Elevation: 7,663
Peak Elevation: 11,321
Hiking Elevation Gain: 4,794
Distance: ~11.2 miles (my phone died at 10.1 miles & I had over a mile to go)
Elapsed Time: ~7.5 hours
Date: July 27, 2025


There’s surprisingly little information out there about summiting White Baldy—so consider this the definitive playbook for peak bagging this rugged Wasatch summit.
If you're looking for the easiest and least technical route, your best option is to approach from Red Pine Fork and gain the western ridge between No Name Baldy and White Baldy. This line minimizes technical terrain and it also offers a more pleasant hiking experience.
Compared to White Pine Fork, Red Pine has several key advantages:
Less foot traffic once you pass the Pfeifferhorn turnoff
More shade as the lower section is a singletrack trail compared to a fire road up White Pine
Park at the White Pine parking lot and head towards the White Pine trail. At about the .8 mile point, you will come to a fork and you want to go right towards Red Pine Lake (left takes you to White Pine).

You will meander through the forest for the next 2 miles as you gain 1,400. At around 3 miles, you will come to the gorgeous Red Pine Lake. You will pass on the left (east) side of the lake.

After about a half a mile after Red Pine Lake, you will encounter the lower boulder fields.

Once you crest this knoll, Upper Red Pine Lake will be on your left

You will now get your first glimpse of the towering White Baldy.


From here, target the saddle between White Baldy and No Name Baldy.

But I suggest not going all the way to the ridge. In this situation, the ridge is undulating and it offers less flexibility in terms of route navigating. I basically paralleled the ridge but stayed 10-20 yards below it which offered more bouldering flexibility.

Here is a pinpoint of my location on a map.

As you get closer to the top, it gets steeper but never very technical and the boulders are very firm (as opposed to the White Pine ascent which has very loose rocks).

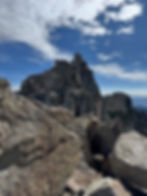
When you finally crest the ridge, it might feel like you’ve made it—but you’re actually standing on the summit shoulder. From here, you have about 0.2 miles to go to reach the pinnacle. Expect one or two false summits along the way—so manage your expectations. The prominent high point you see pictured below is one of the false summits.
Traversing the ridge takes about 10-15 minutes and again- nothing technical or scary. You will know when you hit the summit when you see the pole below.

The summit is the high point of both Red and White Pine Forks thus it offers unparalleled views into both of these forks. As you see below, the ridge that separates Red & White is another approach coming up from Lake Peak. From what I understand, that line is more technical, so I chose not to attempt it. That said, I don’t have solid intel on its difficulty—just anecdotal reports—so if you're considering that approach, proceed with caution and do your research.

And a great view of Pfeifferhorn to the west.

I wanted to experience what it would have been like to come up White Pine so I elected to traverse east on the ridge and descend into White Pine. I am not saying I regret that decision but I can assure you that the Red Pine route is much easier. The traverse across the ridge reminded me of the approach up Pfeifferhorn as it was more of a knifes edge with the north side dropping off several hundred feet. It is all manageable if you are comfortable with exposure. There was only one section that required me to drop down the south side about 20 feet to avoid a precarious & exposed downclimb.
If you download my Strava gpx, you will notice that I continued along the ridge too far as I thought the line was to go to West Pass. I eventually got to a cliff and I tried to pass above it which was aggressive as it was definitely a no fall zone. I got to a point where the risk was too great without ropes and I assumed I was off trail because it was way to technical for a class 3-4 hike.

So I cautiously slinked across the top of the cliff and hiked back up about 100 yards to the far north ridge where I saw a worn out path. So if you are ascending from White Pine, don't go to West Pass. Here is a photo of the ascent up from West Pass from one of my previous hikes and you can see the cliffed out section on the left.

Instead of going towards West Pass, you will want to heads towards the northeast ramp as seen below and walk along the snow line.


The descent down the northeast ramp is tricky due to the very loose shale. In an effort to find more stable footing, I found myself gradually getting pushed left (west) and I ended up exiting the top section through a narrow hourglass-shaped gap above the lingering snowfield.
The AllTrails route keeps farther to the right (east), so once I reached the lower boulder field, which was much more stable, I angled right to reconnect with the White Pine fire road. As you're descending, your goal should be to aim to the right (east) of White Pine Lake as you don't want to ascend all the way to the lake because you will have to hike back up to catch the road.
Once you connect with the road, you have about 5 miles and 2,500 of relaxed hiking back to the car.